Secure Boot in Windows
Secure Boot constitutes a vital component within modern Windows servers and client devices, forming an integral aspect of the Unified Extensible Firmware Interface (UEFI) specification. Its primary function involves the validation of trusted software components during the boot process, thereby fortifying system security against diverse malware and unauthorized software infiltrations.
As a fundamental industry norm, Secure Boot delineates the framework through which platform firmware oversees certificates, verifies firmware authenticity, and regulates the operating system’s interaction within this paradigm. The mechanism relies on the Public Key Infrastructure (PKI) process to authenticate modules before permitting their execution. These modules encompass firmware drivers, option ROMs, UEFI drivers stored on disk, UEFI applications, and UEFI boot loaders. By subjecting images to authentication prior to execution, Secure Boot mitigates the risk of pre-boot malware attacks, such as rootkits.
Microsoft incorporates UEFI Secure Boot into its security architecture, Trusted Boot, for Windows 8 and subsequent versions, thereby augmenting platform security for its clientele. Secure Boot is obligatory for client PCs operating Windows 8 and above, as well as for Windows Server 2016, in accordance with the stipulations outlined in the Windows Hardware Compatibility Requirements.

How Secure Boot Works
The Secure Boot process works as follows and as described below:
- Firmware Boot Components Verification: The firmware ensures that the OS loader is from a trusted source, such as Windows or another recognized operating system.
- Windows Boot Components Verification: Components like BootMgr, WinLoad, and Windows Kernel Startup verify the signature of each component. If any component lacks proper verification, it will not be loaded, triggering Secure Boot remediation.
- Antivirus and Antimalware Software Initialization: This software undergoes a check for a special signature issued by Microsoft, confirming its status as a trusted boot critical driver. It launches early in the boot process.
- Boot Critical Driver Initialization: Signatures on all Boot-critical drivers are checked during Secure Boot verification in WinLoad.
- Additional OS Initialization
- Windows Logon Screen
UEFI Secure Boot is an integral part of Microsoft’s Trusted Boot Architecture, introduced with Windows 8.1. A notable trend in malware evolution involves targeting the boot path as a preferred attack vector. This class of attack is challenging to defend against because antimalware products can be disabled by malicious software, preventing them from loading entirely.
With the Windows Trusted Boot architecture and the establishment of a root of trust via Secure Boot, customers are shielded from malicious code executing in the boot path. This assurance is achieved by allowing only signed, certified “known good” code and boot loaders to execute before the operating system loads, thus enhancing system security significantly.
What happens when you Enable/Disable Secure Boot
Enable Secure Boot provides essential protection against various malware attacks, including the insidious threat of rootkits, which can compromise sensitive data and system integrity by intercepting passwords, login details, keystrokes, and cryptographic information. It ensures data security, enhances system speed, and promotes smooth operation by verifying the authenticity of the boot process.
However, there are situations when it becomes necessary to Disable Secure Boot. This allows for certain functionalities that may not be compatible with Secure Boot’s strict digital signature verification. When you Disable Secure Boot:
- Windows can be booted from external hard drives or USB devices.
- Dual-boot setups, such as Windows with Linux or Fedora, become feasible.
- Windows password recovery tools can be used for troubleshooting and system access.
- Compatibility with older versions of Windows is maintained.
Disable Secure Boot means the PC won’t validate the digital signature of the operating system during the boot process, providing more flexibility but potentially compromising the security provided by Secure Boot. Users should carefully weigh the trade-offs and consider the implications before making changes to their system’s Secure Boot settings.

How to disable secure boot
Usually, the secure boot option is turned on by default with your Windows server PC, but there are some cases when it is already disabled. To confirm and to disable secure boot you need to open device settings from Windows Security Center and see that if the option exists.
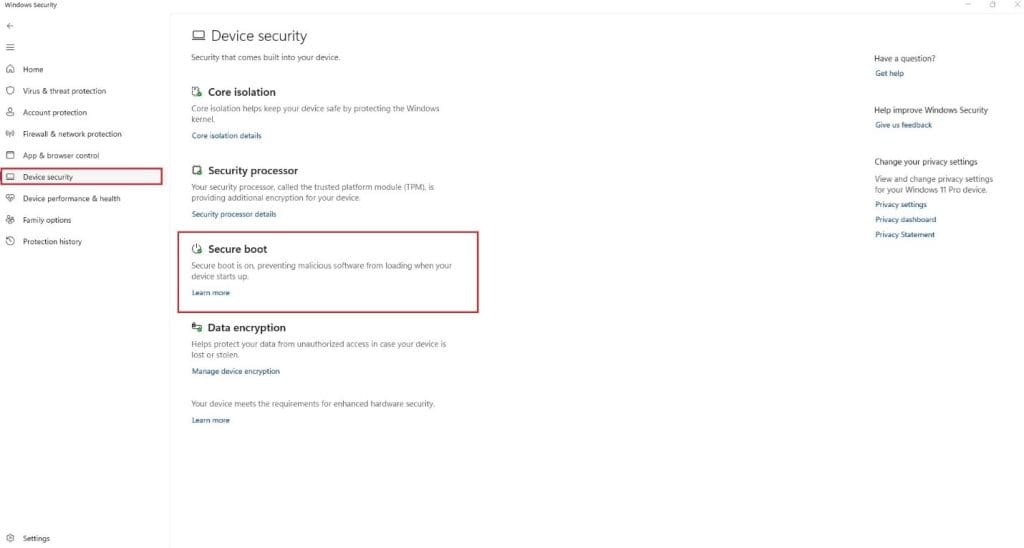
If you see this Secure Boot option there, it means that secure boot is enabled on your device otherwise disabled.
Now we will talk about a step by step guide on how to disable secure boot:
- Reboot the windows machine while pressing and holding SHIFT key from your keyboard.

2. After rebooting you will be presented with a blue screen with a few options in it. Choose Troubleshoot from there and hit Enter.

3. Next, click on the "Advanced options" from the list:

4. In the Advanced options, hit the "UEFI Firmware Settings" from the options:

5. It will notify that you'll have to restart in order to change any UEFI firmware settings (or UEFI settings in short). Click on the Restart

6. Your system will restart now and when it boots again, you'll find yourself in the BIOS/UEFI settings interface. This interface is designed differently for different manufacturers.
7. Now, the user has to navigate to the "Secure Boot" option in the BIOS menu. Its location typically varies from PC to PC. Usually, it is present in the "Security", "Boot configuration", or the "Authentication" To turn off Secure Boot, click on the "Disable" button or turn off the "On" option.
For DELL PC the BIOS interface might seem somewhat like the following screenshot.

For most HP PC(s). You will see such an option.

Acer's option might seem somewhat similar to the following screenshot.

8. After making changes save the settings and exit from the BIOS menu. Your system will be rebooted and with Secure Boot disabled.
How to enable secure boot
As mentioned earlier the secure boot option is enabled by default however there are some cases when is it not enabled or was disabled manually. In such a case let's discuss how to enable it.
- Uninstall any graphics cards, hardware, or operating systems that aren't compatible with Secure Boot.
- Follow all the above steps to go to the BIOS settings of your PC.
- Once inside simply turn the feature on the same way like you turned it off in the previous section.
For Example:

4. Save the settings and exit from BIOS menu.
5. Your PC will be rebooted with Secure Boot enabled.
6. If the PC doesn’t allow you to enable Secure Boot, try resetting the BIOS back to the factory settings.
Secure Boot Can Be Enabled When System in User Mode
Users frequently encounter errors when attempting to activate Secure Boot on their systems, such as the “Secure Boot Can Be Enabled When System in User Mode” problem. What prompts this issue?
- Absence of User Mode Activation: This error commonly arises due to the system’s failure to operate in User Mode. Secure Boot functionality can only be engaged when the system operates in User Mode.
- Firmware Incompatibility: Another factor could be the lack of support for Secure Boot in your system’s firmware. In such instances, updating your firmware to the latest version becomes necessary.
- Corrupted Boot Configuration Data (BCD): The presence of corrupted BCD can also trigger this issue. BCD plays a pivotal role in booting the operating system, and if it becomes corrupted, enabling Secure Boot may encounter obstacles.
Solutions
This issue can be fixed with the following methods.
Method 1: Convert MBR to GPT
- Press the Win + R to open Run.
- Type msc and hit Enter. It will open the Disk Management window.

3. Right-click on your disk on the left and select "Properties."
4. Switch to the "Volumes" tab and check the "Partition style."

5. If it says "MBR," open the Command Prompt as an administrator.
6. Type "mbr2gpt.exe /convert /allowfullos" and press Enter.

7. Wait for the validation and conversion process to complete.
8. Check the partition style in Disk Management again to see if it now says "GUID Partition Table (GPT)."
Method 2: Disable CSM and re-install Windows
- Go into your BIOS settings and look for the "Compatibility Support Module (CSM)"
- Disable CSM and save your changes.
- In some BIOS menu you might see "Legacy Boot" instead of

4. Create a Windows installation media and boot from it.
5. Follow the prompts for installing Windows on your computer.
5. Check the "Secure Boot State" in System Information to see if it now says "On."
It is crucial to note that disabling CSM and reinstalling Windows can lead to data loss due to its process, which includes formatting the hard drives and deleting all stored data. So, make sure you have taken the backup of your important data before applying this fix.
Secure boot is enabled but not active
Reports have surfaced indicating that some users encounter the issue of “Secure Boot Enabled but not Active” on their devices, particularly during Windows installations. This problem seems to be increasingly common.
The primary reason behind this issue is often the “Secure Boot Disabled” setting in the UEFI firmware configuration. Despite appearing enabled in Windows, this feature remains inactive due to its disabled status in the firmware settings. Merely enabling it in the Windows environment does not suffice; manual activation via BIOS settings is necessary to resolve this issue, as previously outlined.
Another prevalent cause is the activation of the Compatibility Support Module (CSM) within the system’s UEFI settings. Enabling this option contributes to the error at hand. Corrective measures involve adjusting the settings through the established steps.
Lastly, outdated BIOS versions contribute significantly to various problems, including the occurrence of “secure boot enabled but not active.” This emphasizes the importance of keeping the BIOS up-to-date to mitigate such issues. Regardless of whether you own a Dell or ASUS device, similar errors may arise due to these underlying reasons.
Secure boot configuration hardening
Server hardening is essential for bolstering the security of systems, with features like secure boot playing a crucial role in safeguarding Windows servers and PCs against malware injection during the boot process.
Secure boot, embedded within the BIOS, ensures that only trusted firmware, drivers, and operating systems are loaded during startup, significantly reducing the risk of malicious tampering. Despite its protective benefits, there may be instances where disabling secure boot becomes necessary for specific reasons.
When you disable secure boot it should occur only temporarily and for valid reasons, with the feature promptly re-enabled once its necessity has ceased. This approach ensures that the system maintains its resilience against potential security threats, underscoring the importance of configuration hardening in maintaining robust cybersecurity defenses.

Subscribe to Email Updates
- Posts by Topic
- CIS (20)
- Compliance (20)
- Configuration Setting (66)
- Domain Controller (3)
- Hardening (18)
- IIS (4)
- NIST (10)
- NTLM (8)
- PCI (3)
- Powershell (7)
- RDP (4)
- SAM (5)
- Security Guides (16)
- SMB (1)
- SQL (5)
- TLS SSL (4)
- Vulnerabilities (22)